Deploy Keras neural network to Flask web service | Part 5 - Host VGG16 model with Flask
text
Keras neural network deployment - Host model with Flask
In this episode, we'll be building the backend of our Flask application that will host our fine-tuned VGG16 Keras model to predict on images of dogs and cats. In general, you should be able to take our approach here and apply it to any model you'd like.
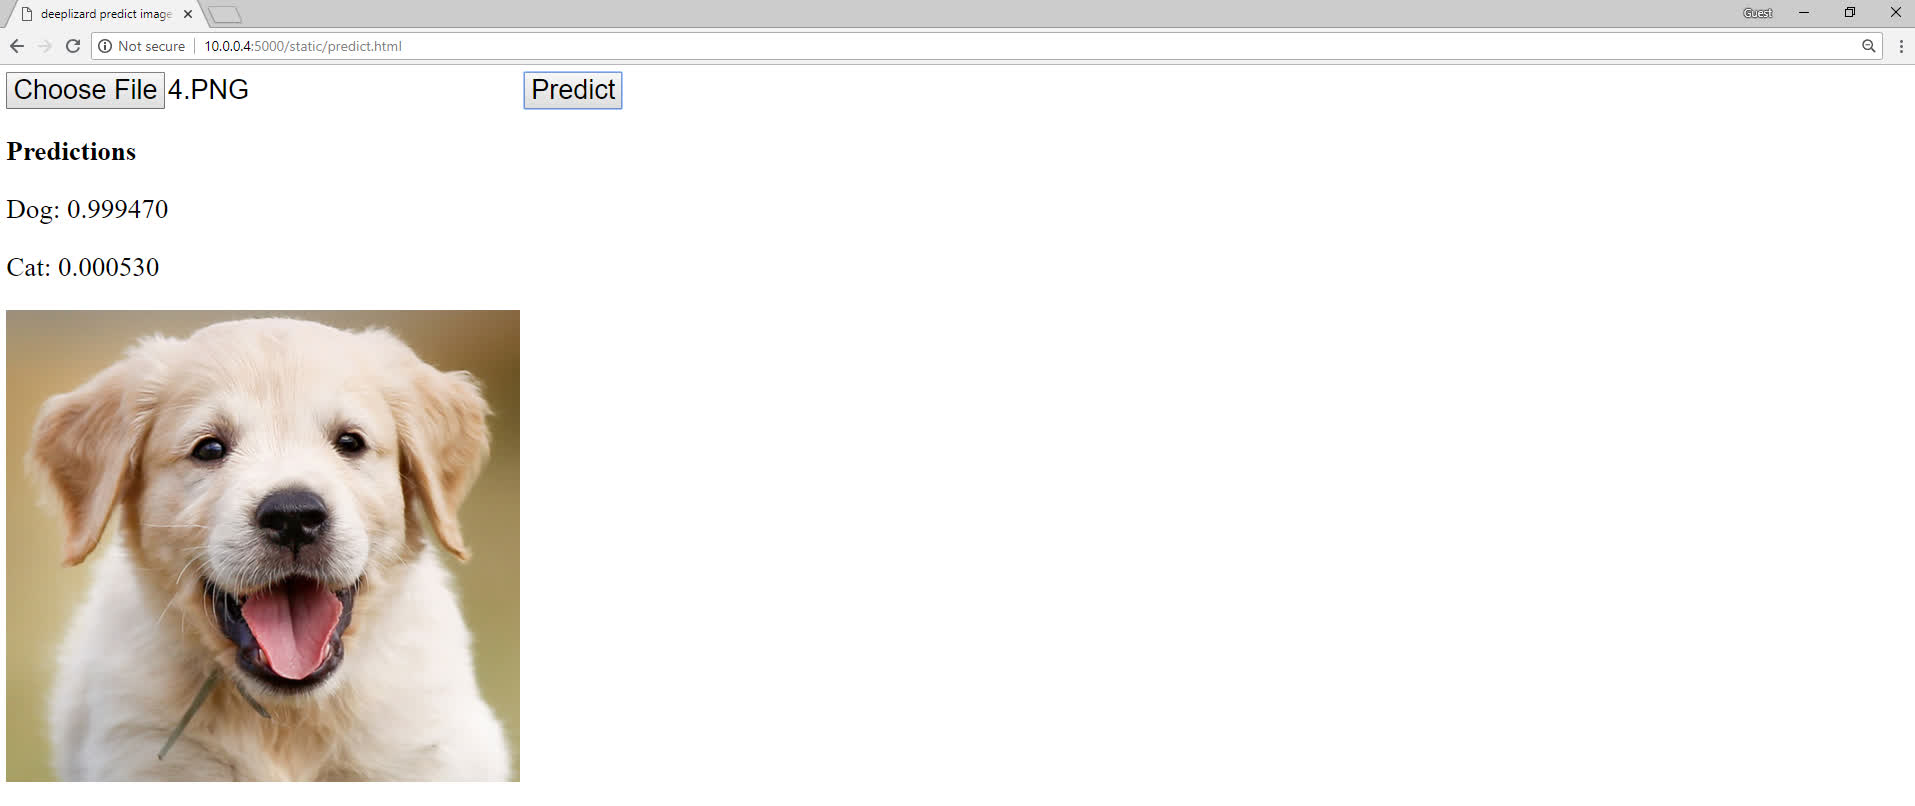
At this point, we should be generally comfortable with Flask given our two simple applications we've built so far. Remember from an earlier episode, I showed you a sneak peak of what our application would look like that uses a Keras model to predict on cat and dog images.

We select an image of a cat or dog, press Predict, and get predictions from our model. We'll be developing the backend of this application using Flask in this episode.
Within your flask_apps directory, go ahead and create a predict_app.py file. This will be where the code resides for the web service we'll develop. Additionally, place your
fine-tuned VGG16 model, in the form of an h5 file, in this directory as well.
Now let's jump into the code for our prediction app. Open predict_app.py.
Web service code
We'll be making use of several dependencies, so go ahead and get all of the dependencies listed below imported at the top of your predict_app.py file.
import base64
import numpy as np
import io
from PIL import Image
import tensorflow as tf
from tensorflow import keras
from tensorflow.keras.models import Sequential, load_model
from keras.models import load_model
from tensorflow.keras.preprocessing.image import ImageDataGenerator, img_to_array
from flask import request
from flask import jsonify
from flask import Flask
Then, create an instance of the Flask class with the app variable, as per usual.
app = Flask(__name__)
Next, we have a function called get_model() that is going to load our VGG16 model into memory.
def get_model():
    global model
    model = load_model('VGG16_cats_and_dogs.h5')
    print(" * Model loaded!")
All this function does is defines a global variable called model and sets it to the Keras function load_model, which is passed the file name of the h5 file for which we've saved our model. Remember this is the model I stated to place in your flask_apps directory a moment ago.
Once this model is loaded, the function prints a message letting us know.
Then, we have a function called preprocess_image().
def preprocess_image(image, target_size):
    if image.mode != "RGB":
        image = image.convert("RGB")
    image = image.resize(target_size)
    image = img_to_array(image)
    image = np.expand_dims(image, axis=0)
    return image
This function accepts an instance of a PIL image (a Python Image Library image) and a target_size for the image. This function processes the supplied image to get it into the format
it needs to be in before passing it to our Keras model.
First, it checks to see if the image is already in RGB format, and if it's not, it converts it to RGB. Then, it resizes the image to the specified target_size. It then converts
the image to a numpy array, and expands the dimensions of the image.
The function then returns a processed version of the image, which can now, in this format, be directly passed to our Keras model.
Next, we print a message that states the Keras model is being loaded, and then we call the get_model() function to load our model into memory. We do this ahead of time so that the model is not
having to be loaded into memory each time a request comes into our endpoint.
print(" * Loading Keras model...")
get_model()
Next, we have the decorator, and we're creating this for a new endpoint called predict. This endpoint allows POST requests, as specified in the
methods parameter, which makes sense because we'll need to be sending our image data to this endpoint to get a prediction.
We then define the predict() function for the predict endpoint.
@app.route("/predict", methods=["POST"])
def predict():
    message = request.get_json(force=True)
    encoded = message['image']
    decoded = base64.b64decode(encoded)
    image = Image.open(io.BytesIO(decoded))
    processed_image = preprocess_image(image, target_size=(224, 224))

    prediction = model.predict(processed_image).tolist()

    response = {
        'prediction': {
            'dog': prediction[0][0],
            'cat': prediction[0][1]
        }
    }
    return jsonify(response)
Within this function, we first define the variable message and set it to the JSON from the POST request, and we covered the details of this line in an
earlier episode of this series.
Next, we define the variable called encoded, which is assigned the value associated with the key called image from the JSON data stored in the message variable.
As you can see, we're setting this endpoint up to receive JSON data, and we're also setting it up to require that JSON has at least one key-value pair, for which the key is called image.
The value associated with this key should be a base64 encoded image sent by the client.
Since this image data will be encoded, we need to decode it. We define this variable called decoded and set it to base64.b64decode(), and pass the encoded variable
to it. So, decoded will be assigned the decoded image data.
Next, we define a variable called image and set it to an instance of a PIL image. Image.open() opens an image file. We have our image data in memory as bytes, stored within the
decoded variable, not in an actual file. So we need to wrap our bytes (i.e., the decoded variable) in io.BytesIO, and pass that to Image.open().
Next, we create a variable called preprocessed_image and set it to the function preprocess_image(), which we covered at the start of our program. We pass our image to this function, along with the target_size of (224,224), since that's the size VGG16 expects.
We then create a variable called prediction and set it to model.predict(). Remember, this model variable is global and was already initialized in the get_model() function at the top of our program. To the predict() function, we pass our preprocessed image. Predict returns a numpy array with the predictions, so we then call tolist() on
prediction to convert the array into a Python list, because it's required for the jsonify call we make later in the program.
We then create this response variable, which we define as a Python dictionary. This is the response we plan to send back to the client with the cat and dog predictions for the original image.
This dictionary has a key, called prediction, which itself is a dictionary. prediction contains a cat key and a dog key. The values for each of these keys
will be the respective values returned by the model's prediction for each. So, for a given image, the model may assign a 95% probability to dog, and 5% to cat. In this case, we'd want the value
for the dog key to be 0.95, and the value for the cat key to be 0.05.
To do this, we set the value for dog as the 0th element of the 0th list in the prediction list, and the value for cat as the 1st
element of the 0th list in the prediction list.
Since we're only predicting on one image, the prediction list will only contain one embedded list, with a probability for dog and a probability for cat.
Lastly, we then jsonify this response to convert this Python dictionary into JSON, and we return this JSON to the front end.
Looking at this from a high level, everything we just went through should flow pretty intuitively. We have a message that comes in. We get the encoded image from the message. We decode it. We create an image object with the decoded message. We preprocess that image. Pass it to the model for a prediction, and then send this prediction, as JSON, back to the client.
Starting the Flask web service
So, that's it for the backend. Go ahead and make sure you can start the app from the terminal.
export FLASK_APP=predict_app.py
flask run --host=0.0.0.0
Recall, if you're running Flask from a Windows command prompt or Powershell, check the earlier episode for the correct corresponding command.
After exporting our new app and starting Flask, we should first see the message for the Keras model being loaded. This may take a few seconds. Then a message should display letting us know that the model was loaded. After this, the ordinary messages from Flask should appear letting us know that our app is running.
* Loading Keras Model...
* Model loaded!
* Serving Flask app "predict_app"
* Running on http://0.0.0.0:5000/
Let me know in the comments if you're up and running successfully, and in the next episode, we'll make the front end web application to call our new predict endpoint. See ya there!
quiz
resources
updates
Committed by on


 DEEPLIZARD
Message